How to install Firewall
Step I – RADIUS client configuration
To permit the Cyberoam® device to communicate with your ESA Server, you should configure the device as a RADIUS client on your ESA Server:
- Log in to ESA Web Console.
- Navigate to Components > RADIUS and locate the hostname of the server running the ESA ESA RADIUS service.
- Click the hostname, at that point click Create New Radius Client.
- In the Essential Settings segment:
- So, Give the RADIUS client an important name for simple reference.
- Hence, Configure the IP Address and Shared Secret for the Client with the goal that they compare to the setup of your VPN apparatus. The IP address is the inward IP address of your machine. In the event that your machine imparts through IPv6, utilize that IP address alongside the connected extension ID (interface ID).
- furthermore, The shared secret is the RADIUS shared secret for the outer authenticator that you will configure on your apparatus.
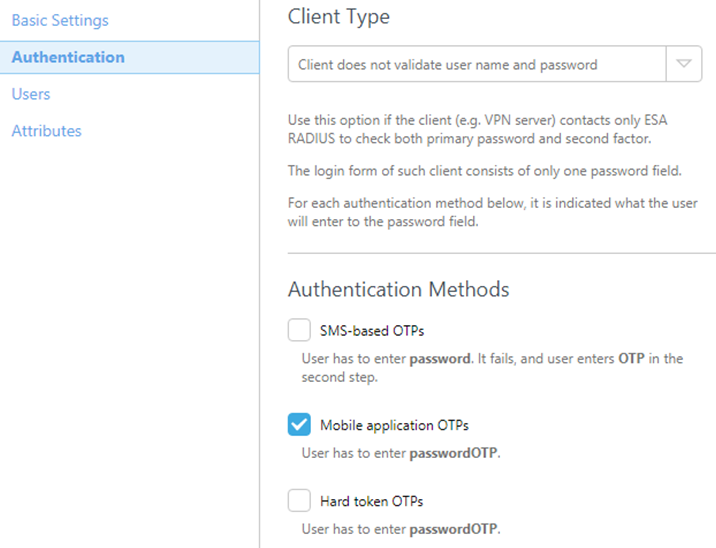
- In the Authentication section apply the settings appeared in Figure
Step II – Configure the RADIUS server settings for your Cyberoam® device
Follow the steps below to install Firewall:
- Log in to the Cyberoam® Web Administrator Console .
- Navigate to Identity → Authentication → Authentication Server
- Click Add
Enter the accompanying:
- Enter the accompanying:
- Select RADIUS Server from the Server Type drop down.
- Server Name: A name for this server (for instance, ESA-Span).
iii. Server IP: The IP address of your ESA RADIUS Server.
- In, Authentication Port: 1812
- Shared Secret: Your RADIUS server shared secret
- So, Integration Type: Loose Integration
- Click Test Connection. Enter the certifications of your test client. Ensure that you are utilizing a client with Portable Application 2FA utilizing ESA empowered. When provoked for a secret word, affix the OTP created by the ESA Versatile Application to your Promotion secret key. For instance, if the client has an Advertisement secret word of Esa123 and an OTP of 999111, you should type Esa123999111.
- Click on Test Association. You should see a triumph status message in the base left, Try not to continue to Step III until the availability test is effective
Step III – Enable ESA Authentication
- In the left board, explore to Identity → Authentication → VPN.
- So, Configure the pertinent VPN Verification Techniques. For instance, for SSL VPN Confirmation, select “ESA RADIUS” as the validation strategy,
- Hence, Click Apply, at that point ok.
Step IV – Test the association to install Firewall
To test the newly configured connection:
Navigate to your sign-in page.
- Enter the accompanying certifications utilizing your test account:
- So, AD username in the Username field.
- Moreover, AD secret phrase, connected with an OTP from their ESA Versatile application in the Secret word field.
- Investigating
- In the event that you can’t confirm through the ESA Range worker, ensure that you have played out the accompanying advances:
- Run a smoke test against your Sweep worker, according to the Checking ESA Span Usefulness.
- Hence, If no shortcomings were fixed and you are as yet unfit to associate, return to a current sign-in arrangement that doesn’t utilize 2FA and check that you can interface.
- So If you can associate utilizing the old settings, reestablish the new settings and confirm that there is no firewall impeding UDP 1812 between you VPN gadget and your Sweep worker.
- If you are as yet incapable to associate, contact ESET specialized help.