Authorize and Deauthorize Computer on iTunes
How to Authorize and Deauthorize a Computer on iTunes or Apple Music
If you would like to access your purchased music, movies, and other media on a computer, you’ll have to authorize it on iTunes or Apple Music first. Here’s a way to authorize and deauthorize a Mac or Windows 10 computer on iTunes or Apple Music.
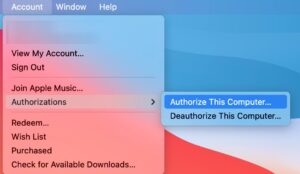
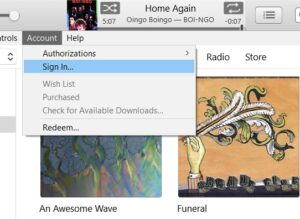
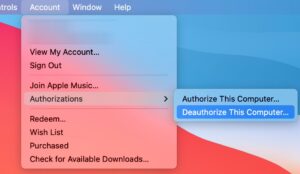
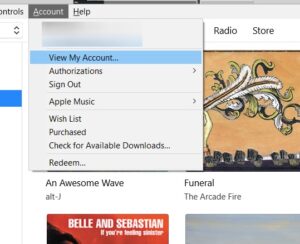
Then click check in and enter your Apple ID and password. Next, click Account again and hover over Authorizations and choose Authorize This Computer. 1. Open the Music or iTunes app on your Mac computer. counting on which version of macOS you’re running, you’ll find either of those in your Applications folder. 2. Then click Account. you may see this within the Apple Menu Bar at the highest of your screen once you decide on the app. 3. Next, click sign on.
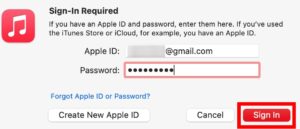
- Then enter your Apple ID and Password and click on sign on. If you don’t know your Apple ID or password, click Forgot Apple ID or Password within the pop-up window.
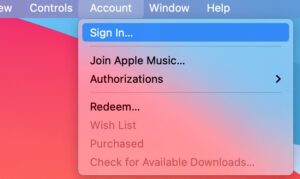
- Next, click Account again.
- Then hover your mouse over Authorizations and choose Authorize This Computer.
If you had any problems authorizing your Mac computer, take a look at the section on the way to deauthorize all of your computers below. If you would like to understand the way to use a licensed computer to share music on iTunes or Apple Music over your network.
Take a look at our step-by-step guide here.
Authorize and deauthorize a Mac or Windows 10 computer on iTunes or Apple Music
To authorize your Windows computer, open the iTunes app and click on Account within the menu bar. Then click check in and enter your Apple ID and password. Next, click Account again and hover over Authorizations and choose Authorize This Computer.
- Open the iTunes app on your Windows 10 computer.
- Then click Account. you may see this at the highest of your iTunes window.
- Next, click register.
- Then enter your Apple ID and Password and click on sign up.
- Next, click Account again.
- Finally, hover your mouse over Authorizations and click on Authorize This Computer.
If you had any problems authorizing your Windows computer, take a look at the section on the way to deauthorize all of your computers below. Note: you’ll only authorize a computer or device with a unique Apple ID once every 90 days. So, you ought to ensure that you simply don’t want to reauthorize your device with a replacement Apple ID soon.
To deauthorize your Mac computer
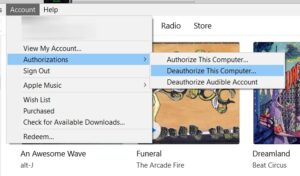
Open the iTunes or Apple Music app and click on Account within the menu bar.
Next, click Account again and hover over Authorizations and choose Deauthorize This Computer.
- Open the Music or iTunes app on your Mac computer.
- Then click Account. you’ll see this within the Apple Menu Bar at the highest of your screen once you decide on the app.
- Next, click register and enter your Apple ID and Password.
- Next, click Account again. 5. Finally, hover your mouse over Authorizations and click on Deauthorize This Computer.

To deauthorize your Windows computer.
Open the iTunes app and click on Account at the highest of the window. Then click check in and enter your Apple ID and password. Next, click Account again and hover over Authorizations and choose Deauthorize This Computer.
- Open the iTunes app on your Windows computer.
- Then click Account. you may see this at the highest of your iTunes window.
- Next, click register and enter your Apple ID and Password.
- Then click Authorizations > Deauthorize This Computer.
If you have got deauthorized your computer, and you continue to have too many authorized devices, you’ll be able to deauthorize all of your computers without delay. Here’s how: Note: you’ll be able to only deauthorize all of your computers once a year, so confirm that you simply don’t authorize any computers that you simply can’t deauthorize with the steps above.
How to Deauthorize all of your Computers on a Mac.
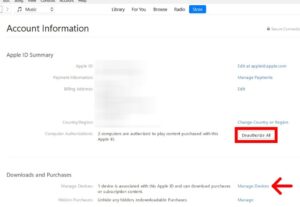
To deauthorize all of your computers on a Mac, open the iTunes or Apple app and click on Account within the Menu Bar. Then click sign on and enter your Apple ID and password. Next, click Account > View My Account and register again. Finally, click Deauthorize All.
- Open the Music or iTunes app on your Mac computer.
- Then click Account. you may see this within the Apple Menu Bar at the highest of your screen.
- Next, click sign up and enter your Apple ID and Password.
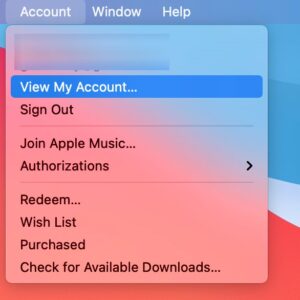
- Then click Account again.
- Next, click View My Account.
- Then click Deauthorize All. you’ll see this next to Computer Authorizations.
- Finally, click Deauthorize dead the pop-up window.
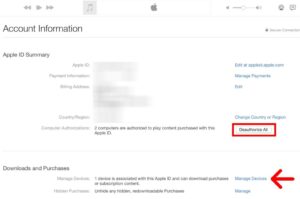
This may show you all of your authorized devices and allow you to deauthorize them individually by clicking Remove.

How to Deauthorize all of your Computers on a Windows 10 PC.
Authorize and deauthorize a Mac or Windows 10 computer on iTunes or Apple Music
To deauthorize all of your computers on a Windows 10 PC, open the iTunes app and click on Account at the highest of the window. Then click register and enter your Apple ID and password. Next, click Account > View My Account and sign on again. Finally, click Deauthorize All.
- Open the iTunes app on your Windows 10 computer.
- Then click Account. you’ll see this at the highest of your iTunes window.
- Next, click check in and enter your Apple ID and Password.
- Then click Account again.
- Next, click View My Account.

- Then enter your Apple ID and password and click on sign on.
- Next, click Deauthorize All. you may see this next to Computer Authorizations.

- Finally, click Deauthorize dead the pop-up window.
You can also see which devices are authorized by clicking the Manage Devices button below. this may show you all of your authorized devices and allow you to deauthorize them individually by clicking Remove.